Configuring Security with CLI

This section provides information to configure security using the command line interface.

Topics in this section include:

Setting Up Security Attributes

Configuring Authentication

Refer to the following sections to configure authentication:

  1. Local authentication
  2. RADIUS authentication (only)
    By default, authentication is enabled locally. Perform the following tasks to configure security on each participating router:
  3. RADIUS authentication
    To implement only RADIUS authentication, with authorization, perform the following tasks on each participating router:
  4. TACACS+ authentication
    To implement only TACACS+ authentication, perform the following tasks on each participating router:
  5. LDAP authentication
    To implement only LDAP authentication, perform the following tasks on each participating router:

Configuring Authorization

Refer to the following sections to configure authorization.

  1. Local authorization
    For local authorization, configure these tasks on each participating router:
  2. RADIUS authorization (only)
    For RADIUS authorization (without authentication), configure these tasks on each participating router:
    For RADIUS authorization, VSAs must be configured on the RADIUS server. See Vendor-Specific Attributes (VSAs) on page 51.
  3. RADIUS authorization
    For RADIUS authorization (with authentication), configure these tasks on each participating router:
  4. TACACS+ authorization (only)
    For TACACS+ authorization (without authentication), configure these tasks on each participating router:
  5. TACACS+ authorization
    For TACACS+ authorization (with authentication), configure these tasks on each participating router:

Configuring Accounting

Refer to the following sections to configure accounting.

  1. Local accounting is not implemented. For information about configuring accounting policies, refer to Configuring Logging with CLI on page 485.

Security Configurations

This section provides information to configure security and configuration examples of configuration tasks.

To implement security features, configure the following components:

  1. Management access filters and CPM filters
  2. Profiles
  3. User access parameters
  4. Password management parameters
  5. Enable RADIUS, TACACS+, and/or LDAP
    1. One to five RADIUS, TACACS+, and/or LDAP servers
    2. RADIUS, TACACS+, and/or LDAP parameters

Configuration Tasks

This section provides a brief overview of the tasks that must be performed to configure security and provides the CLI commands. Table 9 depicts the capabilities of authentication, authorization, and accounting configurations. For example, authentication can be enabled locally and on RADIUS, TACACS+, and LDAP servers. Authorization can be executed locally, on a RADIUS server, or on a TACACS+ server. Accounting can be performed on a RADIUS or TACACS+ server.

Table 9:  Security Configuration Requirements 

Authentication

Authorization

Accounting

Local

Local

None

RADIUS

Local and RADIUS

RADIUS

TACACS+

Local

TACACS+

LDAP

None

None

Security Configuration Procedures

Configuring Management Access Filters

Creating and implementing management access filters is optional. Management access filters are software-based filters that control all traffic going in to the CPM, including all routing protocols. They apply to packets from all ports. The filters can be used to restrict management of the router by other nodes outside either specific (sub)networks or through designated ports. By default, there are no filters associated with security options. The management access filter and entries must be explicitly created on each router. These filters also apply to the management Ethernet port.

The OS implementation exits the filter when the first match is found and execute the actions according to the specified action. For this reason, entries must be sequenced correctly from most to least explicit. When both mac-filter and ip-filter/ipv6-filter are to be applied to a given traffic, mac-filter is applied first.

An entry may not have any match criteria defined (in which case, everything matches) but must have at least an action keyword specified CPM to be considered active complete. Entries without the action keyword are considered incomplete and will be rendered inactive. Management Access Filter must have at least one active entry defined for the filter to be active.

The following CLI commands are an example of how to configure a management access filter on the 7450 ESS. This example only accepts packets matching the criteria specified in entries 1 and 2. Non-matching packets are denied.

The following is an example of a management access filter configuration that accepts packets matching the criteria specified in IP, IPv6 and MAC entries. Non-matching packets are denied for IPv4 filter and permitted for IPv6 and MAC filters.

*A:Dut-C>config>system>security>mgmt-access-filter# info 
----------------------------------------------
                ip-filter
                    default-action deny
                    entry 10
                        description "Accept SSH from mgmnt subnet"
                        src-ip 192.168.5.0/26
                        protocol tcp
                        dst-port 22 65535
                        action permit
                    exit
                exit
                ipv6-filter
                    default-action permit
                    entry 10
                        src-ip 3FFE::1:1/128
                        next-header rsvp
                        log
                        action deny
                    exit
                exit
                mac-filter
                    default-action permit
                    entry 12
                        match frame-type ethernet_II
                            svc-id 1
                            src-mac 00:01:01:01:01:01 ff:ff:ff:ff:ff:ff
                        exit
                        action permit
                    exit
                exit
----------------------------------------------
*A:Dut-C>config>system>security>mgmt-access-filter# 

Configuring IP CPM Filters Policy

The following displays a CPM filter configuration example:

*A:Dut-C>config>sys>security>cpm-filter# info 
ip-filter
                    shutdown
                    entry 100 create
                        action queue 50
                        log 110
                        match protocol icmp
                            fragment true
                            icmp-type dest-unreachable
                            icmp-code host-unreachable
                            multiple-option false
                            option-present true
                            src-ip 192.100.2.0/24
                        exit
                    exit
                exit
                ipv6-filter
                    shutdown
                    entry 30 create
                        action drop
                        log 190
                        match next-header tcp
                            dscp ef
                            dst-ip 3FFE::2:2/128
                            src-port 100 100
                            tcp-syn true
                            tcp-ack false
                            flow-label 10
                        exit
                    exit
exit
                mac-filter
                    shutdown
                    entry 40 create
                        action accept
                        log 101
                        match frame-type ethernet_II
                            svc-id 12
                            dst-mac 00:03:03:03:01:01 ff:ff:ff:ff:ff:ff
                            etype 0x8902
                            cfm-opcode gt 100
                        exit
                    exit
                exit
*A:Dut-C>config>sys>security>cpm-filter# 

Configuring MAC CPM Filters

CPM filters and queues control all traffic going in to the CPM, including all routing protocols. They apply to packets from all network and access ports, but not to packets from a management Ethernet port. CPM packet filtering and queuing is performed by network processor hardware using no resources on the main CPUs. CPM filters and queues are not configurable on one-slot chassis.

The following displays a MAC CPM filter configuration example:

*A:ALA-49>config>sys>sec>cpm>mac-filter# info
----------------------------------------------
                    entry 10 create
                        description "MAC-CPM-Filter 10.10.10.100 #007"
                        match
                        exit
                        log 101
                        action drop
                    exit
                    entry 20 create
                        description "MAC-CPM-Filter 10.10.10.100 #008"
                        match
                        exit
                        log 101
                        action drop
                    exit
                    no shutdown
----------------------------------------------
*A:ALA-49>config>sys>sec>cpm>mac-filter#

Configuring IPv6 CPM Filters

The following example displays an IPv6 CPM filter configuration:

A:ALA-48>config>sys>sec>cpm>ipv6-filter# info
                    entry 10 create
                        description "IPv6 CPM Filter"
                        log 101
                        match next-header igp
                            dst-ip 1000:1:1:1:1:1:1:1/112
                            src-ip 2000:1::1/96
                            flow-label 5000
                        exit
                    exit
                    entry 20 create
                        description "CPM-Filter 10.4.101.2 #201"
                        log 101
                        match next-header tcp
                            dscp af11
                            dst-ip 3FEE:12E1:2AC1:EA32::/64
                            src-ip 3FEE:1FE1:2AC1:EA32::/64
                            flow-label 5050
                        exit
                    exit
                    no shutdown
A:ALA-48>config>sys>sec>cpm>ipv6-filter# 

Configuring CPM Queues

CPM queues can be used to provide rate limit capabilities for traffic destined to CPM as described in an earlier section of this document.

The following example displays a CPM queue configuration:

A:ALA-987>config>sys>security>cpm-queue# info
----------------------------------------------
                queue 33 create
                exit
                queue 101 create
                    cbs 5
                    mbs 5
                    rate 5 cir 5
                exit
                queue 102 create
                    cbs 5
                    mbs 5
                    rate 5 cir 5
                exit
                queue 103 create
                    cbs 5
                    mbs 5
                    rate 5 cir 5
                exit
                queue 104 create
                    cbs 5
                    mbs 5
                    rate 5 cir 5
----------------------------------------------
A:ALA-987>config>sys>security>cpm-queue# 

IPSec Certificates Parameters

The following is an example to importing a certificate from a pem format:

*A:SR-7/Dut-A# admin certificate import type cert input cf3:/pre-import/R1-0cert.pem
 output R1-0cert.der format pem
 

The following is an example for exporting a certificate to pem format:

*A:SR-7/Dut-A#  admin certificate export type cert input R1-0cert.der output cf3:/
R1-0cert.pem format pem
 

The following displays an example of profile output:

*A:SR-7/Dut-A>config>system>security>pki# info
----------------------------------------------
                ca-profile "Root" create
                    description "Root CA"
                    cert-file "R1-0cert.der"
                    crl-file "R1-0crl.der"
                    no shutdown
                exit
----------------------------------------------
*A:SR-7/Dut-A>config>system>security>pki#
 

The following displays an example of an ike-policy with cert-auth output:

*A:SR-7/Dut-A>config>ipsec>ike-policy# info
----------------------------------------------
            ike-version 2
            auth-method cert-auth
            own-auth-method psk      
----------------------------------------------
 

The following displays an example of a static lan-to-lan configuration using cert-auth:

...
    interface "VPRN1" tunnel create
        sap tunnel-1.private:1 create
            ipsec-tunnel "Sanity-1" create
                security-policy 1
                local-gateway-address 30.1.1.13 peer 50.1.1.15 delivery-service 300
                dynamic-keying
                    ike-policy 1
                    pre-shared-key "Sanity-1"
                    transform 1
                    cert
                        trust-anchor "R1-0"
                        cert "M2cert.der"
                        key "M2key.der"
                    exit
                exit
                no shutdown
            exit
        exit
    exit

Configuring Profiles

Profiles are used to deny or permit access to a hierarchical branch or specific commands. Profiles are referenced in a user configuration. A maximum of sixteen user profiles can be defined. A user can participate in up to sixteen profiles. Depending on the authorization requirements, passwords are configured locally or on the RADIUS server.

The following example displays a user profile output:

A:ALA-1>config>system>security# info
----------------------------------------------
...
            profile "ghost"
                default-action permit-all
                entry 1
                    match "configure"
                    action permit
                exit
                entry 2
                    match "show"
                exit
                entry 3
                    match "exit"
                exit
            exit
...
----------------------------------------------
A:ALA-1>config>system>security#
 

Parameters

Matching in authorization profiles allows the use of parameters and optional parameters. A set of angle brackets <...> indicates matching on a parameter and/or optional parameter.

The following rules govern parameter matching in the CLI:

Rule 1

Any parameter and/or optional parameter can be present in the match string.

Rule 2

When a parameter and/or optional parameter is present in the user-profile match string, all parameters or optional parameters to its left must also be stated/present.

Rule 3

The user can either specifically state or completely omit unnamed parameters in the match string, as required. However, all unnamed parameter in the CLI command must be present in the match string when matching on an unnamed parameter is used.

For example, consider the OSPF command:

*A:SwSim14# configure router ospf 
  - no ospf [<ospf-instance>]
  - ospf [<ospf-instance>] [<router-id>]
 
<ospf-instance>      : [0..31]
<router-id>          : <ip-address>

In this case, the user can match on OSPF to allow or deny the command per user-profile, as follows:

Match “configure router ospf” action deny

Or the user can decide to only allow a certain OSPF instance for a user, as follows:

Match “configure router ospf <ospf-instance-value> <router-id-value>”
Note:

Although the user’s matching is based on <ospf-instance-value> that is “an unnamed value”, all other unnamed values in the OSPF command (such as the <router-id-value>) must also be present in the match string.

Rule 4

When multiple unnamed parameters are present in the match string, the parameters must be provided in the correct order as described in the command help to generate the correct match behavior. For example, using the order of parameters described in the OSPF command usage in Rule 3 above, use the following statement for a user-profile match:

match “configure router ospf <ospf-instance-value> <router-id-value>

The desired match behavior might not be achieved if the unnamed parameters <ospf-instance-value> and <router-id-value> are out of order with respect to the help screen.

The following displays a parameter matching output:

config>system>security>profile# info
                entry 10
                    match "show router <22> route-table "
                    action permit
                exit
                entry 20
                    match "configure service vprn <22>"
                    action read-only
                exit
                entry 30
                    match "show service id <22>"
                    action permit
                exit
                entry 40
                    match "configure router interface <system>"
                    action deny
                exit

Wildcards

In addition, parameter configuration is facilitated by the availability of wildcards (.*) in the OAM subtree and for commands such as “ping”, “trace-route” and “m-trace”. For example, consider the following command:

ping <ip-address> router 10 

Instead of listing all the permitted IP addresses in the policy, as shown in the following example,

Match ping <10.0.0.1> router <10>
Action permit
Match ping <10.0.0.2> router <10>
Action permit

The wildcard<ip-address> parameter allows a a simpler search criterion. In the following example, the use of <.*> wildcard enables you to ping any address in the router 10 context, that is, any address in VRF 10:

Match ping <.*> router <10> 
Action permit
Note:

While wildcards are available and allowed for all parameters in the OAM subtree, Nokia recommends that caution is exercised when using wildcards and limit their use to commands such as ‘ping’, ‘trace-route’ and ‘m-trace’. The use of wildcards in certain formats may be a security concern and result in making the IP addresses in the VRF, including the base routing table, unreachable. Or it could allow the customer to ping any IP address in the VRF, including the base routing table. This may be a potential security concern and should be avoided.

For example, the following usage is not advised:

Match ping <.*> router <.*> 
Action permit

CLI Session Resource Management

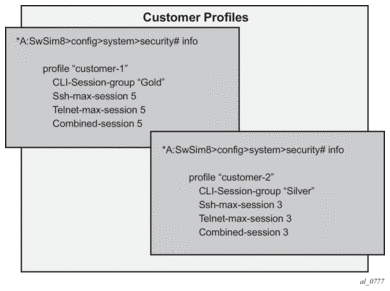
SR OS has the capability to manage telnet/ssh sessions per user and at a higher level per system. At the system level, the user can configure a cli-session-group for different customer priorities. The cli-session-group is a container that sets the maximum number of CLI sessions for a class of customers, with a unique session limit for each customer. For example, as depicted in Figure 10, “Gold” category customers can have a cli-session-group that allows them more telnet/ssh sessions compared to “Silver” category customers.

Figure 10:  cli-session-group for Customer Classes 

The configured cli-session-group can be assigned to user-profiles. At the user profile level, each profile can be configured with its own max ssh/telnet session and it will be policed/restricted by the higher order cli-session-group that is assigned to it.

As depicted in Figure 11, the final picture is a hierarchical configuration with top-level cli-session-groups that control each customer’s total number of ssh/telnet sessions and the user-profile for each user for that customer.

Figure 11:  Hierarchy of cli-session-group Profiles  

Every profile will subtract one from it’s corresponding max-session when a TELNET or SSH session is established in the following cases:

  1. where multiple profiles are configured under a user
  2. where multiple profiles arrive from different AAA servers (Local Profile, Radius Profile or Tacacs Profile)

The first profile to run out of corresponding max-session will limit future TELNET or SSH sessions. In other words, while each profile for the user can have its independent max-session, only the lowest one will be honored. If the profile with the lowest max-session is removed, the next lower profile max-session will be honored and so on. All profiles for a user are updated when a TELNET or SSH session is established.

For information about login control, see Configuring Login Controls.

Use the following CLI commands to configure CLI session resources:

CLI Syntax:
config>system>security>profile <name>
[no] ssh-max-sessions session-limit
[no] telnet-max-sessions session-limit
[no]combined-max-session session-limit
[no] cli-session-group session-group-name

Configuring Users

Configure access parameters for individual users. For user, define the login name for the user and, optionally, information that identifies the user.

The following displays a user configuration example:

A:ALA-1>config>system>security# info
----------------------------------------------
...
            user "49ers"
                password "$2y$10$pFoehOg/tCbBMPDJ/kqpu.8af0AoVGY2xsR7WFqyn5fVTnwRzGmOK"
                access console ftp snmp
                restricted-to-home
                console
                    member "default"
                    member "ghost"
                exit
            exit
...
--------------------------------------------
A:ALA-1>config>system>security#

Configuring Keychains

The following displays a keychain configuration.

A:ALA-1>config>system>security# info
----------------------------------------------
...
            keychain "abc"
                direction
                    bi
                        entry 1 key "ZcvSElJzJx/wBZ9biCtOVQJ9YZQvVU.S" hash2 alg
orithm aes-128-cmac-96
                            begin-time 2006/12/18 22:55:20
                        exit
                    exit
                exit
            exit
            keychain "basasd"
                direction
                    uni
                        receive
                            entry 1 key "Ee7xdKlYO2DOm7v3IJv/84LIu96R2fZh" hash2
 algorithm aes-128-cmac-96
                                tolerance forever
                            exit
                        exit
                    exit
                exit
            exit
...
----------------------------------------------
A:ALA-1>config>system>security#

Copying and Overwriting Users and Profiles

You can copy a profile or user. You can copy a profile or user or overwrite an existing profile or user. The overwrite option must be specified or an error occurs if the destination profile or user name already exists.

User

CLI Syntax:
config>system>security# copy {user source-user | profile source-profile} to destination [overwrite]
Example:
config>system>security# copy user testuser to testuserA
MINOR: CLI User "testuserA" already exists - use overwrite flag.
config>system>security#
config>system>security# copy user testuser to testuserA overwrite
config>system>security#

The following output displays the copied user configurations:

A:ALA-12>config>system>security# info
----------------------------------------------
...
            user "testuser"
                password "$2y$10$pFoehOg/tCbBMPDJ/kqpu.8af0AoVGY2xsR7WFqyn5fVTnwRzGmOK"
                access snmp
                snmp
                    authentication hash md5 e14672e71d3e96e7a1e19472527ee969 privacy none
                    group "testgroup"
                exit
            exit
            user "testuserA"
                password ""
                access snmp
                console
                    new-password-at-login
                exit
                snmp
                    authentication hash md5 e14672e71d3e96e7a1e19472527ee969 privacy none
                    group "testgroup"
                exit
            exit
...
----------------------------------------------
A:ALA-12>config>system>security# info
Note:

The cannot-change-password flag is not replicated when a copy user command is performed. A new-password-at-login flag is created instead.

A:ALA-12>config>system>security>user# info
----------------------------------------------
password "$2y$10$pFoehOg/tCbBMPDJ/kqpu.8af0AoVGY2xsR7WFqyn5fVTnwRzGmOK"
access snmp
console
cannot-change-password 
exit
snmp
authentication hash md5 e14672e71d3e96e7a1e19472527ee969 privacy none
group "testgroup"
exit
----------------------------------------------
A:ALA-12>config>system>security>user# exit
A:ALA-12>config>system>security# user testuserA
A:ALA-12>config>system>security>user# info
----------------------------------------------
password ""
access snmp
console
new-password-at-login
exit
snmp
authentication hash md5 e14672e71d3e96e7a1e19472527ee969 privacy none
group "testgroup"
exit
----------------------------------------------
A:ALA-12>config>system>security>user#

Profile

CLI Syntax:
config>system>security# copy {user source-user | profile source-profile} to destination [overwrite]
Example:
config>system>security# copy profile default to testuser

The following output displays the copied profiles:

A:ALA-49>config>system>security# info
----------------------------------------------
...
A:ALA-49>config>system>security# info detail
----------------------------------------------
...
            profile "default"
                default-action none
                entry 10
                    no description
                    match "exec"
                    action permit
                exit
                entry 20
                    no description
                    match "exit"
                    action permit
                exit
                entry 30
                    no description
                    match "help"
                    action permit
                exit
                entry 40
                    no description
                    match "logout"
                    action permit
                exit
                entry 50
                    no description
                    match "password"
                    action permit
                exit
                entry 60
                    no description
                    match "show config"
                    action deny
                exit
                entry 70
                    no description
                    match "show"
                    action permit
                exit
                entry 80
                    no description
                    match "enable-admin"
                    action permit
                exit
            exit
            profile "testuser"
                default-action none
                entry 10
                    no description
                    match "exec"
                    action permit
                exit
                entry 20
                    no description
                    match "exit"
                    action permit
                exit
                entry 30
                    no description
                    match "help"
                    action permit
                exit
                entry 40
                    no description
                    match "logout"
                    action permit
                exit
                entry 50
                    no description
                    match "password"
                    action permit
                exit
                entry 60
                    no description
                    match "show config"
                    action deny
                exit
                entry 70
                    no description
                    match "show"
                    action permit
                exit
                entry 80
                    no description
                    match "enable-admin"
                    action permit
                exit
            exit
            profile "administrative"
                default-action permit-all exit
...
----------------------------------------------
A:ALA-12>config>system>security#
 

RADIUS Configurations

Configuring RADIUS Authentication

RADIUS is disabled by default and must be explicitly enabled. The mandatory commands to enable RADIUS on the local router are radius and server server-index address ip-address secret key.

Also, the system IP address must be configured in order for the RADIUS client to work. See Configuring a System Interface of the Router Configuration Guide.

The other commands are optional. The server command adds a RADIUS server and configures the RADIUS server’s IP address, index, and key values. The index determines the sequence in which the servers are queried for authentication requests.

On the local router, use the following CLI commands to configure RADIUS authentication:

CLI Syntax:
config>system>security
radius
port port
retry count
server server-index address ip-address secret key
timeout seconds
no shutdown

The following displays a RADIUS authentication configuration example:

A:ALA-1>config>system>security# info
----------------------------------------------
                retry 5
                timeout 5
                server 1 address 10.10.10.103 secret "test1"
                server 2 address 10.10.0.1 secret "test2"
                server 3 address 10.10.0.2 secret "test3"
                server 4 address 10.10.0.3 secret "test4"
...
----------------------------------------
A:ALA-1>config>system>security#

Configuring RADIUS Authorization

In order for RADIUS authorization to function, RADIUS authentication must be enabled first. See Configuring RADIUS Authentication.

In addition to the local configuration requirements, VSAs must be configured on the RADIUS server. See Vendor-Specific Attributes (VSAs).

On the local router, use the following CLI commands to configure RADIUS authorization:

CLI Syntax:
config>system>security
radius
authorization

The following displays a RADIUS authorization configuration example:

A:ALA-1>config>system>security# info
----------------------------------------------
...
            radius
                authorization
                retry 5
                timeout 5
                server 1 address 10.10.10.103 secret "test1"
                server 2 address 10.10.0.1 secret "test2"
                server 3 address 10.10.0.2 secret "test3"
                server 4 address 10.10.0.3 secret "test4"
            exit
...
----------------------------------------------
A:ALA-1>config>system>security#

Configuring RADIUS Accounting

On the local router, use the following CLI commands to configure RADIUS accounting:

CLI Syntax:
config>system>security
radius
accounting

The following displays RADIUS accounting configuration example:

A:ALA-1>config>system>security# info
----------------------------------------------
...
           radius
               shutdown
               authorization
               accounting
               retry 5
               timeout 5
               server 1 address 10.10.10.103 secret "test1"
               server 2 address 10.10.0.1 secret "test2"
               server 3 address 10.10.0.2 secret "test3"
               server 4 address 10.10.0.3 secret "test4"
           exit
...
----------------------------------------------
A:ALA-1>config>system>security#

Configuring 802.1x RADIUS Policies

Use the following CLI commands to configure generic authentication parameters for clients using 802.1x EAPOL. Additional parameters are configured per Ethernet port. Refer to the Interface Configuration Guide.

To configure generic parameters for 802.1x authentication, enter the following CLI syntax.

CLI Syntax:
config>system>security
dot1x
radius-plcy policy-name
server server-index address ip-address secret key [port port]
source-address ip-address
no shutdown

The following displays a 802.1x configuration example:

A:ALA-1>config>system>security# info
----------------------------------------------
            dot1x
                radius-plcy "dot1x_plcy" create
                   server 1 address 1.1.1.1 port 65535 secret "a"
                   server 2 address 1.1.1.2 port 6555 secret "a"
                   source-address 1.1.1.255
                no shutdown
...
----------------------------------------------
A:ALA-1>config>system#

TACACS+ Configurations

Enabling TACACS+ Authentication

To use TACACS+ authentication on the router, configure one or more TACACS+ servers on the network.

Use the following CLI commands to configure profiles:

CLI Syntax:
config>system>security
tacplus
server server-index address ip-address secret key
timeout seconds
no shutdown

The following displays a TACACS+ authentication configuration example:

A:ALA-1>config>system>security>tacplus# info
----------------------------------------------
                timeout 5
                server 1 address 10.10.0.5 secret "test1"
                server 2 address 10.10.0.6 secret "test2"
                server 3 address 10.10.0.7 secret "test3"
                server 4 address 10.10.0.8 secret "test4"
                server 5 address 10.10.0.9 secret "test5"
----------------------------------------------
A:ALA-1>config>system>security>tacplus#

Configuring TACACS+ Authorization

In order for TACACS+ authorization to function, TACACS+ authentication must be enabled first. See Enabling TACACS+ Authentication.

On the local router, use the following CLI commands to configure RADIUS authorization:

CLI Syntax:
config>system>security
tacplus
authorization
no shutdown

The following displays a TACACS+ authorization configuration example:

A:ALA-1>config>system>security>tacplus# info
----------------------------------------------
                authorization
                timeout 5
                server 1 address 10.10.0.5 secret "test1"
                server 2 address 10.10.0.6 secret "test2"
                server 3 address 10.10.0.7 secret "test3"
                server 4 address 10.10.0.8 secret "test4"
                server 5 address 10.10.0.9 secret "test5"
----------------------------------------------
A:ALA-1>config>system>security>tacplus# 

Configuring TACACS+ Accounting

On the local router, use the following CLI commands to configure TACACS+ accounting:

CLI Syntax:
config>system>security
tacplus
accounting

The following displays a TACACS+ accounting configuration example:

A:ALA-1>config>system>security>tacplus# info
----------------------------------------------
                accounting
                authorization
                timeout 5
                server 1 address 10.10.0.5 secret "test1"
                server 2 address 10.10.0.6 secret "test2"
                server 3 address 10.10.0.7 secret "test3"
                server 4 address 10.10.0.8 secret "test4"
                server 5 address 10.10.0.9 secret "test5"
----------------------------------------------
A:ALA-1>config>system>security>tacplus#

Enabling SSH

Use the SSH command to configure the SSH server as SSH1, SSH2 or both. The default is SSH2 (SSH version 2). This command should only be enabled or disabled when the SSH server is disabled. This setting should not be changed while the SSH server is running since the actual change only takes place after SSH is disabled or enabled.

CLI Syntax:
config>system>security
ssh
preserve-key
no server-shutdown
version ssh-version

The following displays a SSH server configuration as both SSH and SSH2 using a host-key:

A:sim1>config>system>security>ssh# info
----------------------------------------------
                preserve-key
                version 1-2
----------------------------------------------
A:sim1>config>system>security>ssh# 

LDAP Configurations

Configuring LDAP Authentication

LDAP is disabled by default and must be explicitly enabled. To use LDAP authentication on the router, configure one or more LDAP servers on the network.

TLS certificates and clients must also be configured. Refer to the “TLS” section of the System Management Guide for more information about configuring TLS.

Use the following CLI commands to configure LDAP:

CLI Syntax:
config>system>security>ldap
[no] public-key-authentication
[no] retry
[no] server
[no] shutdown
[no] timeout
[no] use-default-template
config>system>security>password
authentication-order [method] exit-on-reject
config>system>security>ldap
public-key-authentication
server server-index create
address ip-address port port
bind-authentication root-dn [password password] [hash | hash2]
ldap-server server-name
search base-dn
tls-profile tls-profile-name
no shutdown
exit
no shutdown

The following displays an LDAP authentication configuration example:

A:SwSim14>config>system>security>ldap#
----------------------------------------------
    [no] public-key-authentication
    [no] retry
    [no] server
    [no] shutdown
    [no] timeout
    [no] use-default-template
----------------------------------------------
*A:SwSim14>config>system>security>password#
----------------------------------------------
    authentication-order [local | radius | tacplus | ldap] exit-on-reject
----------------------------------------------
*A:SwSim14>config>system>security>ldap# info
----------------------------------------------
    public-key-authentication
    server 1 create
        address 1.1.1.1
        bind-authentication "cn=administrator,cn=users,dc=nacblr2,dc=example,dc=com          password"
        ldap-server "active-server"
        search "dc=sns,dc=example,dc=com"
        tls-profile "server-1-profile"
        no shutdown
    exit
    no shutdown
----------------------------------------------
*A:SwSim8>config>system>security>tls# info
----------------------------------------------
    client-tls-profile "server-1-profile" create
        cipher-list "to-active-server"
        trust-anchor-profile “server-1-ca“
    no shutdown
    exit

Configuring Redundant Servers

Up to five redundant LDAP servers can be configured. The following examples show configuration of two servers, Server-1 and Server-5.

Configuration of Server-1:

A*:SwSim14>config>system>security>ldap# info
    public-key-authentication
    server 1 create
        address 1.1.1.1
        ldap-server “active-server”
        tls-profile “server-1-profile”
 
A*:SwSim14>config>system>security>tls# info
    client-tls-profile “server-1-profile” create
        cert-profile “client-cert-profile”
        cipher-list “to-active-server”
        trust-anchor-profile “server-1-ca”
        no shutdown
    exit

Configuration of Server-5 (backup):

A*:SwSim14>config>system>security>ldap# info
    public-key-authentication
    server 5 create
        address 5.5.5.1
        ldap-server “backup-server-5”
        tls-profile “server-5-profile”
 
A*:SwSim14>config>system>security>tls# info
    client-tls-profile “server-5-profile” create
        cert-profile “client-cert-profile”
        cipher-list “to-backup-server-5”
        trust-anchor-profile “server-5-ca”
        no shutdown
    exit

Enabling SSH

SSH must be enabled to use LDAP authentication. See the Enabling SSH subsection in the TACACS+ Configurations section for more information.

Configuring Login Controls

Configure login control parameters for console, Telnet, and FTP sessions.

The following displays a login control configuration example:

A:ALA-1>config>system# info
----------------------------------------------
...
       login-control
           ftp
               inbound-max-sessions 5
           exit
           telnet
               inbound-max-sessions 7
               outbound-max-sessions 2
           exit
           idle-timeout 1440
           pre-login-message "Property of Service Routing Inc. Unauthorized access
                              prohibited."
           motd text "Notice to all users: Software upgrade scheduled 3/2 1:00 AM"
       exit
 no exponential-backoff
...
----------------------------------------------
A:ALA-1>config>system#